The two hardest working rooms in our house are the laundry/pantry and our playroom. Alright, honestly you could argue that each and every room of our 2800 square foot house is hardworking but that doesn't serve me as well for this post. THIS is about our playroom.
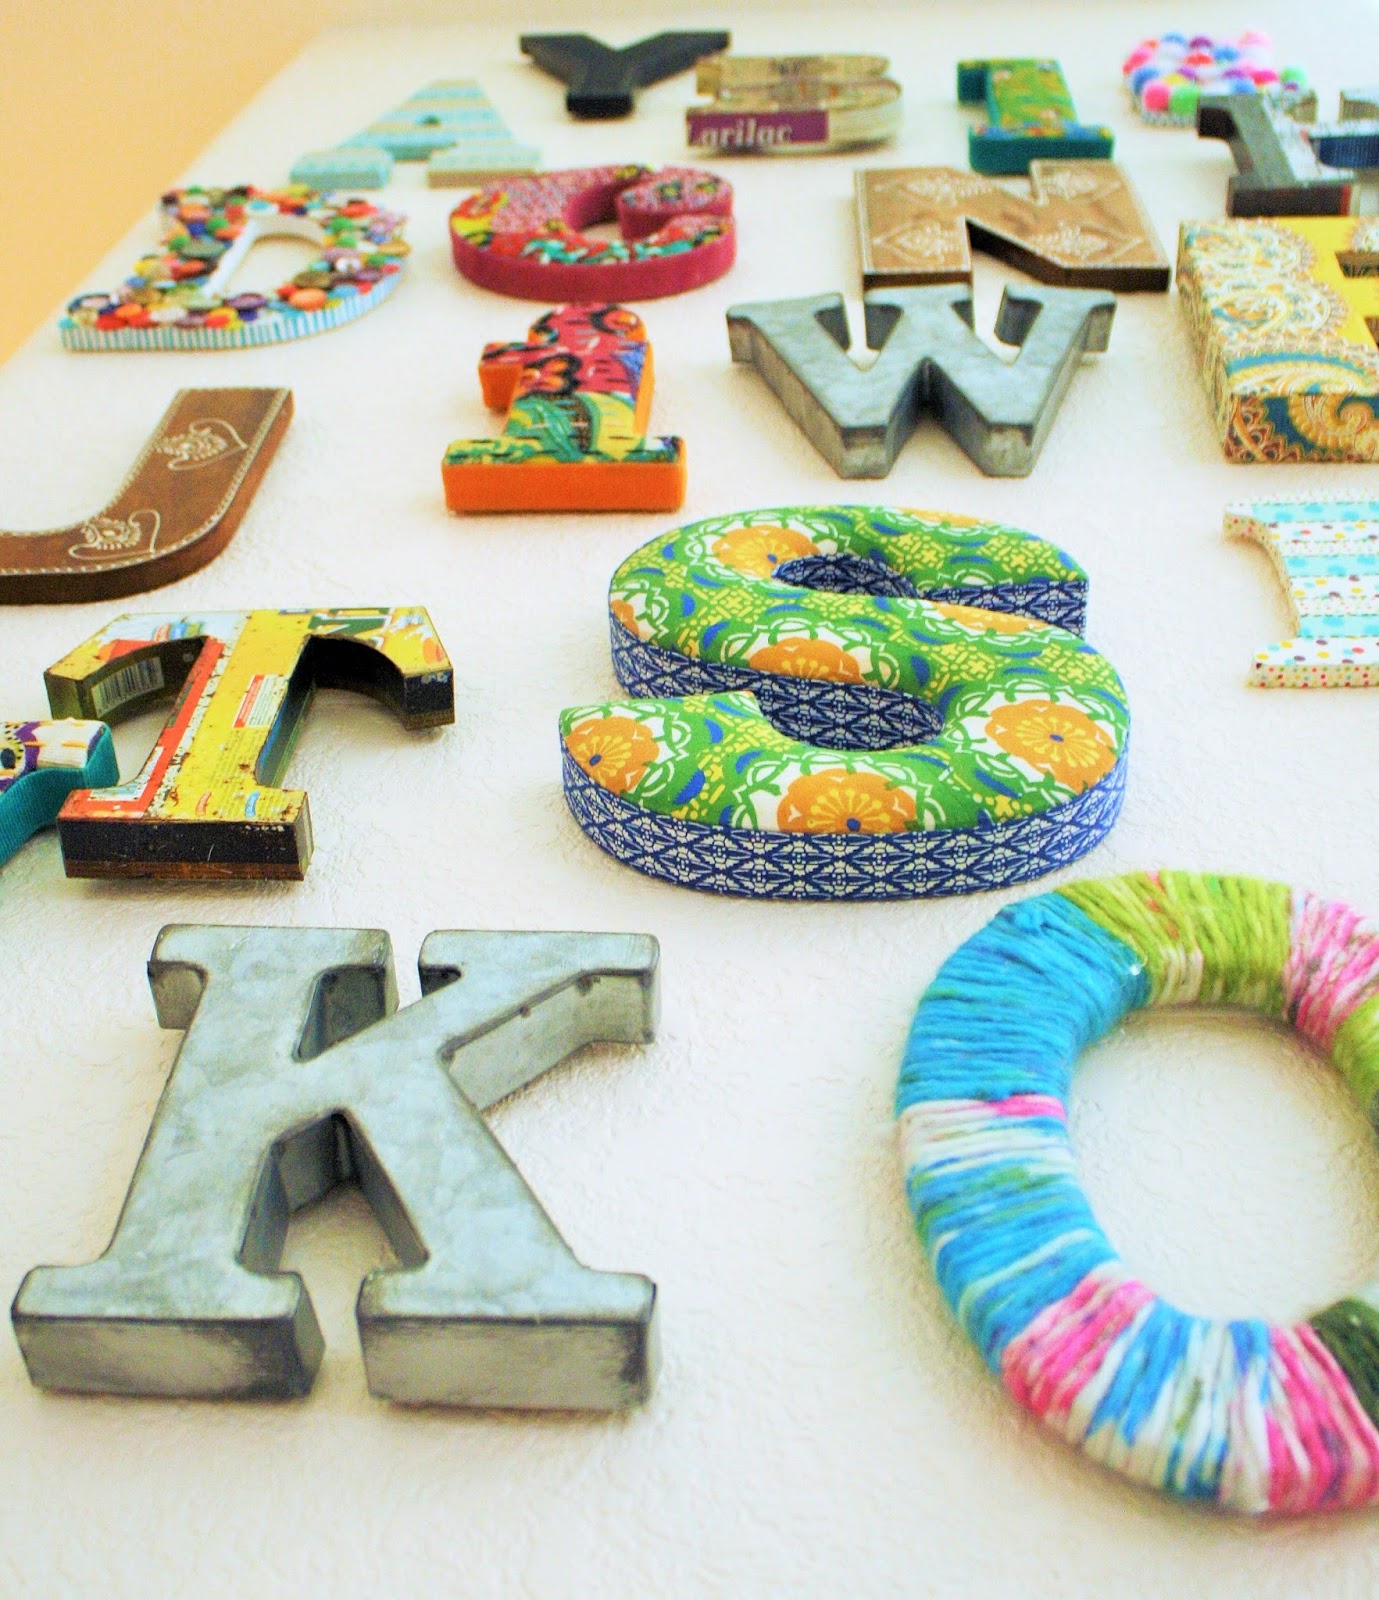
Remember my alphabet wall? Here is another view of it.
We have four kids. The playroom sits at the very front of our house, right by the front door. Most people with this kind of floorplan use this space for their formal dining or living room but puh-lease. We are firmly informal people in this house. We decided years ago to use this space as a playroom.
The space has undergone many revamps over the years. The baby/toddler phase was full of plastic and wood toys and baby gates and color and craziness. Honestly, I don't miss those days too much. Today the space needs to function for two little kids embarking on their first pages of homework, puzzle piecing, drawing, and the occasional doll hospital. It also needs to function as a place to house a large percentage of our family books, an art cart and a prime area to look out the window at the garden. Seriously, we spend a lot of time looking at that garden.
I purchased this white Kallax bookshelf from Ikea about a week ago. I am one of those really strange people who enjoy assembling things from Ikea. Weird, right? Anyway, it took just under an hour to get it together and it is SOLID. I love the glossy finish and generous cubby shelves. The clear baskets on the bottom row were purchased at Target. The transparency makes it easier for my kids to see what they actually have to play with. Since this is a playroom and all, I would like for them to play with their toys. The big red lantern is from Home Goods, as is the crocheted giraffe. That giraffe was a total inpulse buy years ago and I have never regretted it. My ball garland is fashioned from felted wool balls I picked up during my recent trip to Morocco. More on that here.
The big globe is a Goodwill find years ago. We have two children born in Ethiopia and globes have played a necessary part in understanding the journey our family went on to assemble all of us. There is something special about using your finger to trace a story on a globe. It never gets old.
The ball that looks like a colorful soccer ball is from our trip to Ethiopia a few years ago. We bought it at the orphanage where our children were living. See the blue cart in the background there?
There she is! This is the Ikea Raskog cart and it is worth its weight in gold. Although, it doesn't weigh much at all so that analogy won't really work...
This cart is command central for all four kids. I have a few chalk painted mason jars that were left over from another project corralling pencils and markers. The two shelves below are strictly for papers and coloring books. Having all of the art stuff in one simple cart has kept the playroom really clean. Like, shockingly clean.
I made the curtains out of some decorator weight fabric from Hancock Fabric. I always forget how much I hate sewing curtains until it is done and hung and I fall in love. These are the exact curtains that I could not find anywhere.
So that's our playroom space. I have listed a few sources below. Do you have a dedicated playroom in your house? What are your methods for keeping it both fun and functional? I would love to hear them!
Sources:
Black and white curtain fabric from Hancock Fabrics
Large silver star: Taipan Trading
Large red wood lantern: Home Goods
White bookshelf: Ikea
Bookshelf clear baskets: Target
Globes: Home Goods, TJ Maxx, Goodwill
Vintage school house chairs: local thrift and antique stores
Art table: Ikea
Art cart: Ikea
Silver stool: Overstock.com
Showing posts with label Childrens Spaces. Show all posts
Friday, June 26, 2015
Thursday, June 25, 2015
DIY: Playroom Alphabet Wall!

The whole process took quite awhile. I wanted each letter to be perfect, to tell a story. See the letter 'M' there in the bottom left corner? I dug into my vintage button jar and hot glued every cool button I could find. Then I added old wooden game pieces I had. Do the buttons and game pieces have anything to do with the letter 'M'? Of course not. I just liked the way it looked!

I did the same thing with the letter 'D'. This time I also included some vintage earrings and pins I received from a friend. They bejeweled my new "D' quite nicely.
With my letter 'O' I took some gorgeous yarn I had laying around (I don't knit but I love yarn. Go figure...) and simply wrapped it around the form.
I did a little letter prep each week until one day I had them all! It was like Christmas morning. Now it was time to assemble 26 letters on a narrow wall. Initially, I figured I would go in alphabet order. I am slightly OCD and couldn't imagine NOT keeping the letters in order. But once I got everything laid out I realized that I hated it. So I mixed up letters based on size and texture. I kept my Anthropologie letters evenly spaced (I had the most of those) with everything else. Now it all made sense.
I hung each letter on the wall with special 3M Velcro Command Picture Hanging Strips. This stuff is AMAZING. My husband was extremely concerned about me putting 26 nail holes in the wall; these strips made him feel better about my design project.
If you have the time, this is a great project to tackle. It isn't hard at all. What makes this particular DIY work best (in my opinion) is having many different shapes, sizes and textures in your alphabet. And that takes time to acquire organically. I spent many evenings scouring ebay for "vintage alphabet letters" and "fabric letters" and "painted letters". Also for this project, hot glue is your friend.
This is a motif that would look great as an accent wall in a nursery, childrens bedroom, playroom or even an office. In my house, our alphabet takes up the wall between my foyer and playroom and never feels childish or out of place.
Is this a project you would like to try? For more alphabet wall inspiration check out this board on Pinterest!
Labels:
alphabet,
Childrens Spaces,
DIY,
playroom
Sunday, January 5, 2014
DIY: Kids Kitchen Makeover!
This post is originally from my personal blog back in 2009...
________________________________________________________________

I hit the jackpot with a wooden Pottery Barn play kitchen for my kids this past weekend. While it had good bones, it really needed some TLC.
Here was our humble beginning:

I began this process by taking the doors and hardware off and taped it up in preparation for paint. Also, the kitchen was too short for my tall four and six year old so I simply attached feet. The feet are spindles from the stair/banister section at Lowes. I predrilled some holes in the base and screwed the new legs in. BOOM! Necessary play height achieved!

Then it was off to painting. I did away with all over priming since the existing pink was a great base. I simply roughed up the surface with a light sanding with some sand paper. I gave the new spindle feet a quick light coat of white spray paint I had on hand for priming. I used glossy red spray paint and it took two full bottles.

This part took awhile because I wanted an even finish. I allowed for drying time in between coats.
I then repainted the original silver components, added a tile back splash (out of necessity - I messed up with my spray paint on that section), added a new silver piece to the door and embellished it with an antique silver star. I made a little curtain with fabric from my stash and hung it on a small tension rod from Target. Finally, I visited my local Goodwill and picked up a few random small pots and pans. You would be surprised how many small containers there are at thrift stores that are the perfect size for play kitchens. The last piece was a food play set from Melissa and Doug. And that was it! DONE!


It took a little work but was such a fun project. Luckily, Simon and Sophie love it almost as much as I do and have been enjoying it tonight. It is a solid piece of furniture and I am hopeful that it will last not only through my four kids but their kids too. Bon appetite, kiddos!

Thursday, October 24, 2013
Room Tour: Bathroom Redo!
(metal letters purchased years ago from Urban Outfitters)
We have an upstairs hall bathroom that services 4 kids. We inherited the bathroom when we bought the house and haven't done much to it. The previous owners replaced the builder grade vanity with something a little nicer (though not my taste) and then installed a concrete counter. They upgraded the toilet and added crown molding. All in all, it's a fine bathroom...just not what I would have chosen if I had the choice.
When it came to freshening up this bathroom, I decided to go colorful and inexpensive. I mean, come on - it is for 4 kids ages 4-10. I was not going to pour money into the venture. When I want to freshen, I always turn 1) what I've already got by way of decor in my house and 2) Target.
For my shower curtain and bathmat I turned to Target. I picked up this chevron curtain and LOVE the punch of color it gives this otherwise average bathroom. I also picked up lots of new towels in both white and yellow and a new garbage can. We were making progress!
The framed art over the toilet is made by moi and it was VERY simple. I took a bunch of fabric scraps from my stash and pieced them together, glued them to a board and framed them. 30 minutes tops. The blue round iron piece was something we had in the garage from decorating long ago; I freshened it up with some turquoise spray paint. The iron tin holding toilet paper sits on the toilet tank; I picked it up at a favorite Utah haunt called Taipan Trading.
I picked up these little faux plants at Taipan Trading years ago. They sit on the windowsill in the bathroom. The rhino toy belongs to my 4 year old boy. I guess he likes it there :)
More of those awesome chevron print towels from Target. Wooden giraffes purchased from a random import shop in NYC Union Square a few years ago.
I have no idea where this lovely soap dispenser came from but isn't it nice?
I realize that there is A LOT more I could do to this bathroom but for right now I am satisfied. It looks nice for the kids, it is a happy colorful place and it is clean. That fits the bill for a kids bathroom in my book!
Tuesday, October 22, 2013
Room Tour: Sophisticated Teen Room
My friend Sarah has an extraordinary home. It is such fun to visit; every room is infused with personality and color and unique trinkets from ALL over the place. One of my favorite rooms in her home is daughter Lauren's room. For a 13 year old, this is a decidedly sophisticated and whimsical place.
The beautiful headboard is a Craigslist find that Sarah stained a deep red. The neutral bedding is from Target. The lovely old armoire is from a neighbor; Sarah later repainted it white.
I love that this red isn't a typical "red wagon" or "barn red" RED; it is much more sophisticated hue. Pillow from Target.
Sarah made this amazing message board center by wrapping cork board with a grey linen birdcage print. Lauren is an avid artist; this zone is perfect for her to tack up her latest drawings and paintings.
This has long been my favorite piece in Lauren's room. Actually, it is my favorite piece in Sarah's entire house! Lauren made each of these gorgeous paper origami cranes. Sarah then attached them with fishing twine to dowels and configured a kind of chandelier. What an amazing piece of art!
Another of Lauren's paper crane displays hanging in a corner of the bedroom.
Thank you, Lauren for letting us visit your room!
Friday, April 12, 2013
Playroom Redo
Our playroom is actually the front room of our house. And while I like to think of myself as a go with the flow mom...I still like my house to have a decently cohesive feel to it. Ie: not so many primary colored plastic toys near my front door.
So, I pulled together a color scheme I can live with and NOW I am officially happy with our newly redone playroom.
Curtains from World Cost Plus Market. Table top originally from Ikea but sprayed with a hammered metal finish paint
We have these friends on top of our very overstuffed bookshelf. Yarn bombed giraffe from Home Goods, globe from a thrift shop, multi colored ball from our trip to Ethiopia, large star from a store in Utah called Taipan Trading.
I love how things turned out. White kitchen from Pottery Barn Kids
Friday, November 2, 2012
Room Tour: A 3 year old's space
One of my daughters is 3 and she recently moved into her own space. She
is happier in her own little space and the size of this room suits her
well. We kept it simple, with the things that she likes.
I took this "S" from Michaels and wrapped it in fabric years ago; vinyl wall decals from Target.
This is her favorite element in the room, a thrifted and cleaned up play kitchen. My favorite item I added was the coat hanger repurposed as a faucet! I also added trim and bun feet to the base to give it a little more height. It is REALLY solid and heavy - great piece.
I made this fabric banner garland for the back wall of her room and hung some ribbons from either end. It is too high up for her to pull on but still adds a little visual interest to an otherwise blank wall.
This quilt was made a few months ago from my stash fabric and backed with really soft minky chenille. Pink down comforter from Ralph Lauren.
Finally, this has always been her dresser; originally found at a local Goodwill for about $15 I refinished it with a high gloss pink spray paint and then added pink glass knobs. Its not the sturdiest dresser ever but it functions well for now.
Such a happy little room.
Tuesday, October 9, 2012
A British Bedroom
I have a 9 year old son who is interested in all things world travel. He is also a boy...and not terribly interested in room design/ interior fashions. I've made a little headway in his room but I'm not sure that it accurately captures what he is interested in or what he LIKES.
Then I saw this bedroom and thought, "BAM! What a great room! Pulled together, stylish, a little out of the box".
Makes me think I need to revisit that room at the end of the hall again and see if we can come up with some better design choices :) Perhaps I need to sit him down with Pinterest!
Then I saw this bedroom and thought, "BAM! What a great room! Pulled together, stylish, a little out of the box".
Makes me think I need to revisit that room at the end of the hall again and see if we can come up with some better design choices :) Perhaps I need to sit him down with Pinterest!
Wednesday, August 29, 2012
A Treehouse in your Bedroom!
OK, its not an actual treehouse...but its close!
Can you imagine sharing a room with your sibling...but at the end of the day retreating to your own little treehouse/clubhouse within the bedroom? I want to do this!
What an AWESOME shared children's room.
Can you imagine sharing a room with your sibling...but at the end of the day retreating to your own little treehouse/clubhouse within the bedroom? I want to do this!
What an AWESOME shared children's room.
Saturday, August 11, 2012
Hole to Another Universe!
Yes, I will be buying this. How AWESOME for a kids bedroom or playroom? Or even better, in a random place like the powder room? The possibilities are endless!
Friday, January 20, 2012
Thursday, July 28, 2011
Baby Quilt - Brilliant

It may be the most brilliant AND truthful baby blanket ever. That's saying a lot :). Go to the link to find out how to make one. Isn't this great?!
Wednesday, July 27, 2011
DIY: My Playhouse Redo
In early May I was driving around a community yardsale in our area when I struck gold for any mother of four young children: a large Little Tikes outdoor playhouse. And in very good condition. And only $40. SOLD. My car literally did an only-in-the-movies skid into the family's driveway, I yelled out the window, "I'll take it", loaded it and peeled outta there.
The trouble was, the colors were awful. My backyard already looks like Romper Room. I did NOT want to add to it with this Smurf blue door and teal roof. Uggghhhhh. Shuddder.
So I did a little research on spray painting plastics. It turns out there is a whole line of spray paints just for painting outdoor plastic things! I went to Home Depot and gathered the necessary supplies. I took the structure apart (which was very easy considering it is just 10 screws) and began.
First I power washed the structure and let it dry completely.
Next, I roughed up the whole surface of the play structure. I used painters tape to tape off parts I didn't want certain colors on. This part was time consuming (as all taping with painting is). I spray painted over a few afternoons when I had time and when additional coats were necessary (the black roof required several coats of paint because that teal kept bleeding through).

Once everything was dry, I glued a steel number '8' to the front door, moved it into place on our patio and called it a day!
I am SO much happier with the finished result. In truth, this project took twice the amount of time I thought it would and I made a lot of mistakes that I now have to live with (but hey, its a kids plastic playhouse so I'm not going to beat myself up over it).
At least the play house and my backyard looks cohesive now and much less like Romper Room.
Except of course, for the kids :)
Subscribe to:
Posts (Atom)