Pages

Showing posts with label chalk paint. Show all posts

Monday, March 23, 2015

DIY: Make Your Own Pom-Pom Plant


Super colorful right? Great table centerpiece, yes? Trust me, this is beyond simple to do. It will take minimal supplies and maybe 30 minutes of your time. Shall we talk about it then? Yes, lets!

Supplies Needed:

Container for arrangement (I used a small mason jar for this)
Floral block or styrofoam that will fit inside the base of your container
Multiple branches in varying heights appropriate to the size of your container
Colorful pompoms (I bought mine at Michaels)
Glue gun and glue sticks

First, select a container for your arrangement. I simply took a small mason jar that I had already painted with Annie Sloan Chalk Paint. I knew that I wanted a simple, small arrangement to sit on our dining room table so I wasn't going for a huge container.

Next, go into your yard/park/forest/what have you and gather some branches. Select branches based on the size of your container.

Third, get your branches and lay them out of the table. Snap off offending shoots if they don't contribute to your vision of how your arrangement is going to look. Place the styrofoam block at the base of your container and start arranging your branches.

Once you have everything arranged just the way you want it, it's time to fire up the glue gun!

Select the color story you are looking for with your pompoms. I knew that I wanted a multi colored arrangement so no color was off limit. You know how pussy willow bushes look? Here is a photo in the wild of what you are going for with your creation...


Start gluing your pompoms on at spacing that is pleasing to your eye.

Finally, stand back and admire your creation. Adorable, right?!

I used this arrangement not only for my dining room table but also for a baby shower for my niece. This would also be great as a little Christmas tree with small ornaments hanging from it.

Here is another view of my completed arrangement, complimented by my husband and son playing chess :)


Friday, August 29, 2014

DIY: Dressing Up the Foyer...

I have been looking for a long time for a storage savvy piece for my foyer.  Now don't start thinking I have a grand foyer; the very word "foyer" sounds grand doesn't it?  Well, my foyer situation is not grand but after lots of searching and thinking and more searching I finally found the perfect piece.

I found this piece at my local favorite flea/antique haunt.  It was olive green when I found it:


I knew that it needed to be French Louis blue. I used my favorite Annie Sloan chalk paint and cleaned this old girl right up.  It took a good 2 1/2 coats; I spent the bulk of my painting time talking to Sophie so I quite enjoyed myself. I finished the whole piece off with Annie Sloan wax and allowed a few days to dry completely before I styled it.

Here is this beauty NOW:


The drawers contain ALL of our DVD binders and Wii games.  We still have a whole spare drawer for whatever crops up in the future.  I loved the colors and lines of this piece.  Also, it weighs a TON, so it isn't going anywhere anytime soon. Like, it seriously weighs a ton and I still can't believe that I hauled it out of my car and into my house. If I ever doubt my own strength I just have to look at this giant thing and pat myself on the back.


Tuesday, May 20, 2014

DIY: Spring Flowers


We are channeling purples in the dining table flower box today. This simple chalk painted mason jars DIY vintage flower box is still one of my favorite things in our home.


Wednesday, April 9, 2014

DIY: Spring Centerpiece with a Vintage Crate and Mason Jars!

 A few weeks ago I stumbled upon a neighbors garage sale and brought home this beauty of a box!  Vintage, perfect coloring, and wood in good condition.  Then I grabbed my chalkpaint colored mason jars (I made a dozen for a bridal shower back in February), filled them with purple wildflowers and viola!  A spring centerpiece on our dining room table!


Vintage crates like the one pictured above usually go for between $20-$60 depending on dealer, size, condition.  My neighbor gave me a generous price of $20; you can be sure I will be going back to her post haste :).

Wednesday, November 20, 2013

DIY: Kitchen Cabinet Remodel!

I have been absent because of a recent and huge DIY project.  Yes...I painted my kitchen cabinets.  All of them.  In Cece Caldwell Chalk Paint Seattle Mist.  It was an incredible experience and I am thrilled with the outcome.

(Vintage-look stools at the island from Overstock.com - purchased last year for $70.  That was for BOTH and even included shipping.  Overstock.com is the BOMB)

Last year I added bead board around three sides of my island and the ends of my upper cabinet and one lower cabinet.  Of all the things I did in this kitchen, the fitting in of the bead board was the most challenging.  Pieces had to be cut carefully, there was lots of sanding - it was a long process mainly because I had never done it before and had no idea WHAT I was doing.   I purchased the bead board at Home Depot for a total cost of $140.  It has given the island and ends a much more substantial and custom look.

Last year I also added new handles to all of my drawers - 14 handles total at $5 a piece from Lowes for a total of $70.


And see those bun feet?  I installed those too - it gives the cabinets a more custom look.  They were each $5 at Home Depot and I installed 6, for a total of $30.  I still have 3 more to set in but I'm happy with the ones that are in now.


The way the light from my kitchen window hits the cabinets make them seem like they are glowing.  That is the beauty of chalk paint.  You get the chalk paint color but also whatever was underneath - they appear very layered and aged, which is the exact look I was going for.  The bottles that you see are all vintage and from various flea markets over the years.  The grey window is OLD and from a friend.


I removed the small cabinet doors over the microwave and instead filled the space with a dozen old bottles, collected form all over the place.  We never really used this space for storage because it was in an awkward place to access so turning it into a display worked great.  I love the contrast of the clear/blue/green bottles against the aged grey chalk paint.  The Schwepps box is vintage and from my favorite Napa antique store, Antiques on Second.  The Green Valley sign was painted by a local artist on reclaimed barn wood; I purchased it 2 years ago and love how it captures the spirit of where we live.


This is the window over my sink.  I made the over sized valance from burlap and then appliqued a piece of an antique feed sack from Lancaster County, PA (which is where both of my parents grew up).


My multi layered and very ornamented chandelier in the eating area.  It's "garnishes" change with the season and is my favorite part of the whole kitchen.

One thing that was a hugely helpful purchase and is not pictured here were the chrome slider shelves by Rev-a-shelf, sold at Lowes.  We bought three units priced at $100 each and they are AWESOME.

The system we bought looks like this:
 

Totally worth every penny.  Next month I am going to add 4 more to my kitchen island.  Seriously, if you don't have these you need to get some.  Also, they are simple to install.  Read the instructions carefully; I actually watched a youtube video on how to install and it was hugely helpful.

Finally, I was sick of my two trashcans in the kitchen - one for recycling and one for regular trash.  They were constantly moving around and the latch on one of them had been broken for awhile.  So I invested in a really strong trashcan that looks like a piece of furniture in our kitchen.
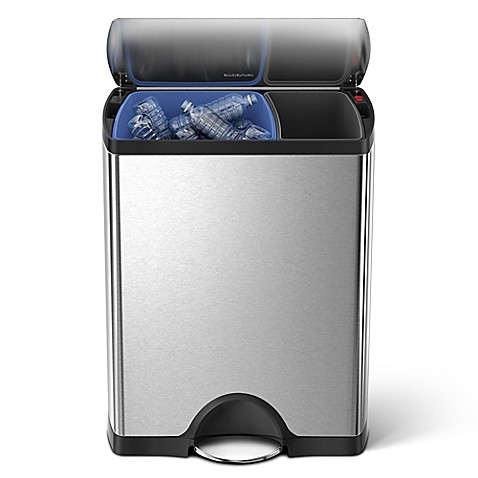
 
 I purchased the Simple Human Recyclers and we love it.  If you can love a trashcan, that is.   I purchased it at Bed Bath and Beyond for $150.

So the total cost breakdown for my kitchen redo is as follows:

Bead board (added 1 year ago) - $140
Cabinet Hardware (added 1 year ago) - $70

2012 - $210

Cece Caldwell Chalk Paint in Seattle Mist (2 containers) - $78
Semi Gloss Polyurethane (2 containers) - $34
Foam Brushes - $20
Rev-a-Shelf chrome organizer units (3 units) - $300
Wood bun feet for cabinets - $30
Simple Human Trashcan - $150

2013 - $612

TOTAL KITCHEN CABINET REMODEL PROJECT - $822

For $822 I am thrilled with my kitchen.  Yes, I need to get new counters but that will come with time.  I LOVE the color of the cabinets.  I love my new shelves and trashcan and decor - I literally would not change a thing.

Next up...my kitchen table and chairs redo.  I had to - I was on a major painting binge!