Pages

Showing posts with label DIY. Show all posts

Thursday, June 25, 2015

DIY: Playroom Alphabet Wall!


Earlier this year I decided to create an eclectic alphabet wall in our playroom. It started with a few fabric letters I had found at Anthropologie and grew from there. Slowly, I collected letters from Urban Outfitters, World Market, off of ebay, thrift stores, and garage sales. Eventually, I purchased several blank letters at Michaels and embellished them myself.


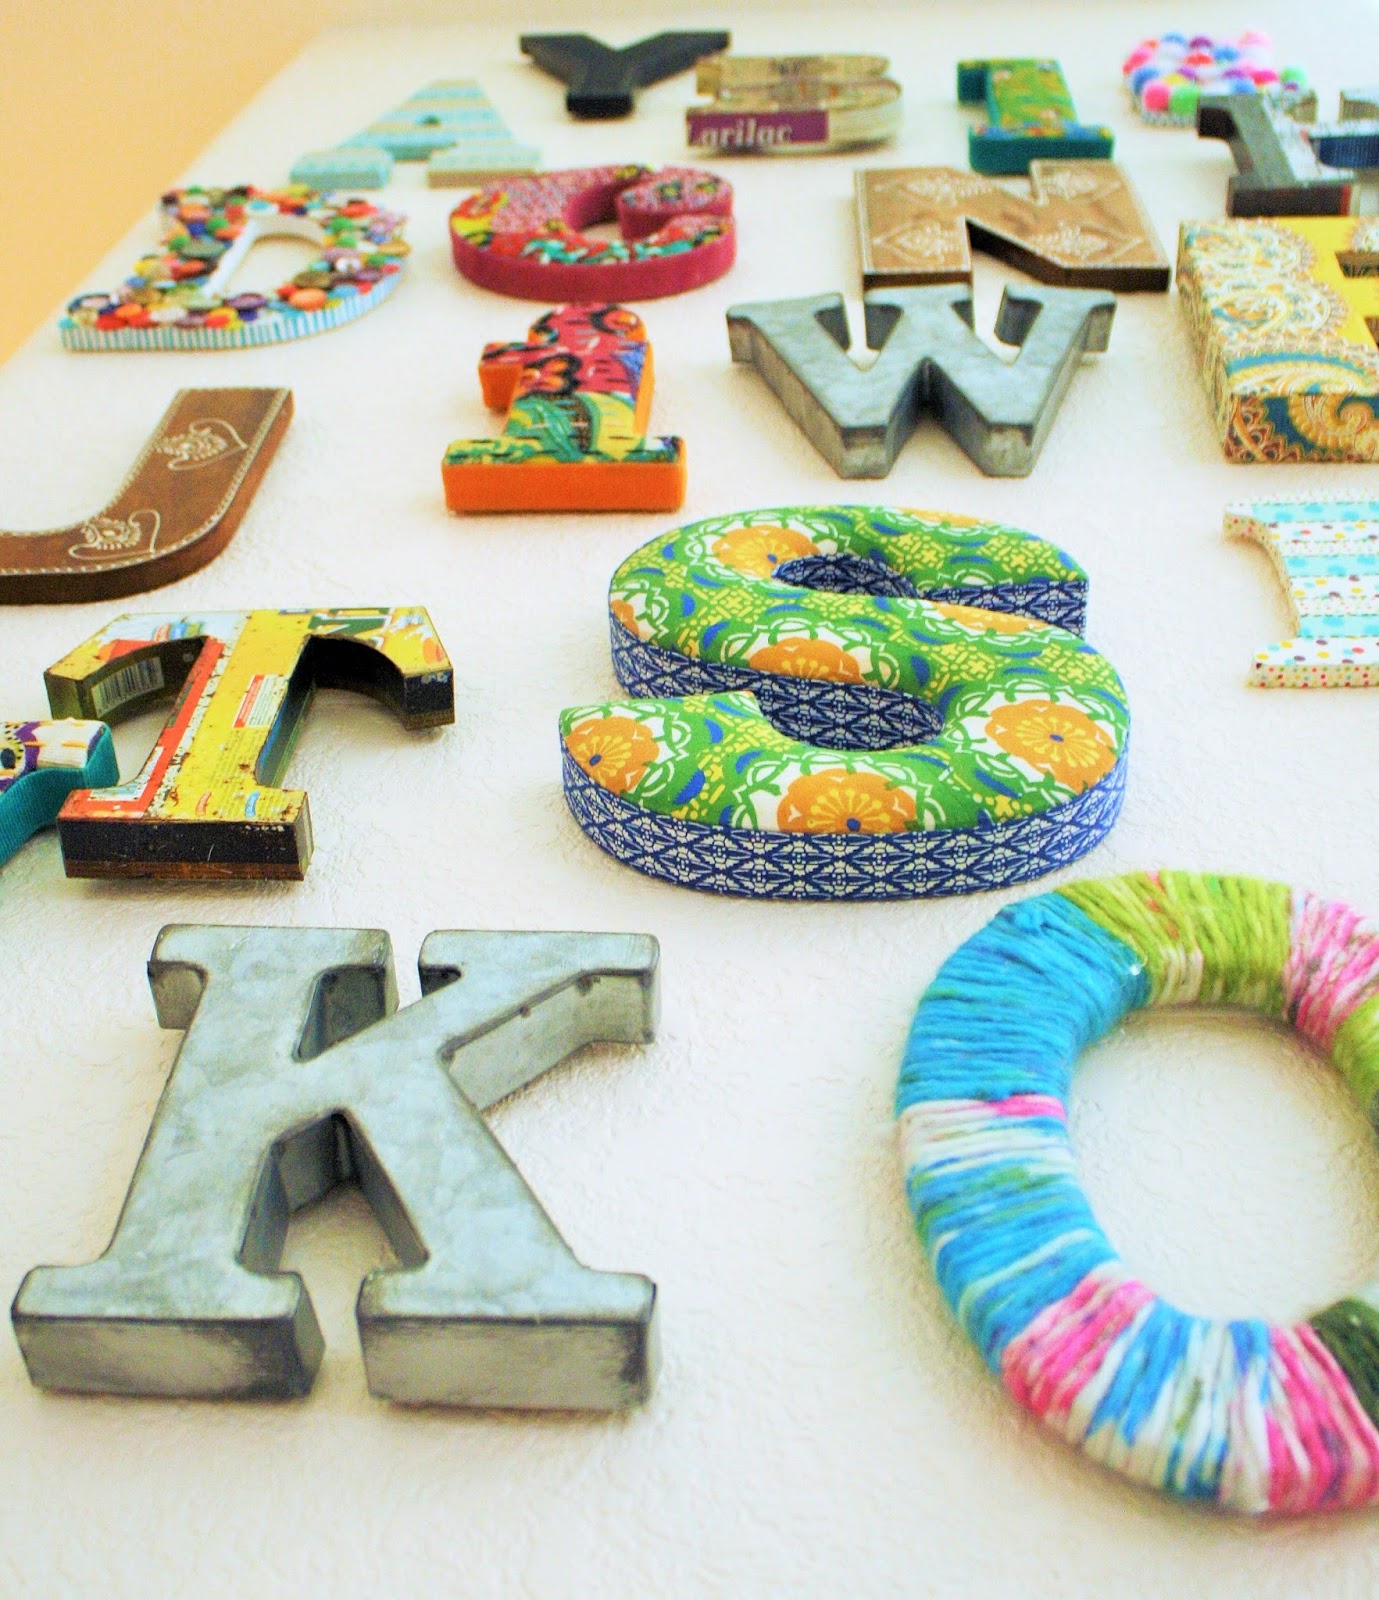
The whole process took quite awhile. I wanted each letter to be perfect, to tell a story. See the letter 'M' there in the bottom left corner? I dug into my vintage button jar and hot glued every cool button I could find. Then I added old wooden game pieces I had. Do the buttons and game pieces have anything to do with the letter 'M'? Of course not. I just liked the way it looked!


I did the same thing with the letter 'D'. This time I also included some vintage earrings and pins I received from a friend. They bejeweled my new "D' quite nicely.

With my letter 'O' I took some gorgeous yarn I had laying around (I don't knit but I love yarn. Go figure...) and simply wrapped it around the form.


I did a little letter prep each week until one day I had them all! It was like Christmas morning. Now it was time to assemble 26 letters on a narrow wall. Initially, I figured I would go in alphabet order. I am slightly OCD and couldn't imagine NOT keeping the letters in order. But once I got everything laid out I realized that I hated it. So I mixed up letters based on size and texture. I kept my Anthropologie letters evenly spaced (I had the most of those) with everything else. Now it all made sense.


I hung each letter on the wall with special 3M Velcro Command Picture Hanging Strips. This stuff is AMAZING. My husband was extremely concerned about me putting 26 nail holes in the wall; these strips made him feel better about my design project.


If you have the time, this is a great project to tackle. It isn't hard at all. What makes this particular DIY work best (in my opinion) is having many different shapes, sizes and textures in your alphabet. And that takes time to acquire organically. I spent many evenings scouring ebay for "vintage alphabet letters" and "fabric letters" and "painted letters". Also for this project, hot glue is your friend.

This is a motif that would look great as an accent wall in a nursery, childrens bedroom, playroom or even an office. In my house, our alphabet takes up the wall between my foyer and playroom and never feels childish or out of place.

Is this a project you would like to try? For more alphabet wall inspiration check out this board on Pinterest!


Wednesday, June 10, 2015

Baby Burp Cloths and Bibs and Beauty, Oh MY!

I have enjoyed running my little baby accessories company Trulaaluu for about 5 years now. Recently, I worked on delivery of burp cloths and bibs using vintage quilt toppers for a favorite store in town that carries my line. Working with such beautiful and old materials makes my heart swell every time. And guys, this stuff isn't that hard. It is really the kind of DIY work that just about anyone can do.


This first step is pretty unglamorous. I pull out all of my patterns and cut away at beautiful material. The novelty wears off after about 20 minutes of cutting and piecing. That's some herbal tea there in the center. It helped :).

The lovely vintage quilt toppers get pinned to cotton chenille fabric. It finally becomes this:


I've been making these for years. My mom helped me develop the pattern almost 10 years ago and I haven't strayed from it. I love the chenille border on the burp cloths and the blankets that I make and I love the size of the bibs. Thanks mom - you did a good job with this pattern!

I find my cotton prints all over the place. If you have been a visitor on this blog for more than five minutes you know that I am drawn to vibrant colors. I do not believe that baby products need to subscribe to the typical pink and blue ONLY. Kids are so much more interesting with their little personalities and proclivities that their products should reflect that! I source my prints from thrift stores, estate sales, vintage sellers on ebay, interesting sheets or old table cloths and occasionally my local Joann's. I always buy my chenille at Joanns. I take advantage of their 40%-50% off coupons that come around every few weeks which keeps my costs a bit lower.

I started making baby accessories when my oldest daughter was a newborn and for the first four years I was going gangbusters. I sold to 50 different retailers, both online and brick and mortar shops. I had retailers in the United Kingdom, Australia, Iceland, Canada and all over the U.S. And then I got totally burnt out. I didn't love what I was doing anymore. I never had a day off; taking vacations was so stressful because I was constantly making and shipping orders. At the time I had two small children and I always felt like I was being pulled in a million different directions. When it came time to start our adoption process of our younger two from Ethiopia, I pulled the plug. I stepped away for two full years.

Gradually I came back but in a MUCH smaller capacity. I thought about retaining a factory and scaling my whole operation much larger. After a lot of soul searching I decided that didn't feel right. Instead I decided to work with 5 shops, all local here in the Bay Area. I make what I want when I want. This direction has worked for me for several years and makes me happy.


 Here are a few of my products featured at one of our local stores. I love walking in and seeing how things I made have been staged!

Have you ever started a small business that got to become too big for you? What did you do?


Friday, May 22, 2015

DIY: Yarn Bombing

Did you know that yarn bombing is a real thing? Like, a legitimate art form?!

My good friend Kristy has been yarn bombing around her neighborhood in NYC and everywhere else that she visits (from California to Iceland) for years now. When she visited our family two years ago she yarn bombed my street sign and a rock in our front yard. BAM! I was hooked.

I am game for anything that I can make with my own two hands and is colorful. Let it be known that I do not know how to knit or crochet. However, that didn't stop me from my yarn bombing exploits! I simply went to our local Goodwill and neighborhood thrift shops and picked up various multi colored afghans and scarves. I chopped them up, attached them to a tree in my back yard (sewing them up with simple needle and thread) and voila! New life given to the faded glory of a thrift shop blanket!


Here is a tree in our backyard. There are afghans, knitted scarves and colorful skeins of wool covering this tree. I also found an adorable already yarn bombed bird feeder from Target (from their Christmas ornament collection last year). I mean...totally fun, right?!

Here is another view of this beauty...


ANYONE can do this. If you are looking to add a little color to your landscape, yarn bombing could be for you. Have at it; you can't go wrong with this art form!


Full disclosure: Over time, yarn will fade outside. The elements will do a number on your brightly colored patchworks of yarn. BUT. You should be able to get 2-3 years of life out of a yarn bomb project. If you live in an area with a lot of rain (sadly, here in the Bay Area we are in a drought so yarn bombs stay regrettably pristine) you may get your colors washed out faster.


Monday, March 23, 2015

DIY: Make Your Own Pom-Pom Plant


Super colorful right? Great table centerpiece, yes? Trust me, this is beyond simple to do. It will take minimal supplies and maybe 30 minutes of your time. Shall we talk about it then? Yes, lets!

Supplies Needed:

Container for arrangement (I used a small mason jar for this)
Floral block or styrofoam that will fit inside the base of your container
Multiple branches in varying heights appropriate to the size of your container
Colorful pompoms (I bought mine at Michaels)
Glue gun and glue sticks

First, select a container for your arrangement. I simply took a small mason jar that I had already painted with Annie Sloan Chalk Paint. I knew that I wanted a simple, small arrangement to sit on our dining room table so I wasn't going for a huge container.

Next, go into your yard/park/forest/what have you and gather some branches. Select branches based on the size of your container.

Third, get your branches and lay them out of the table. Snap off offending shoots if they don't contribute to your vision of how your arrangement is going to look. Place the styrofoam block at the base of your container and start arranging your branches.

Once you have everything arranged just the way you want it, it's time to fire up the glue gun!

Select the color story you are looking for with your pompoms. I knew that I wanted a multi colored arrangement so no color was off limit. You know how pussy willow bushes look? Here is a photo in the wild of what you are going for with your creation...


Start gluing your pompoms on at spacing that is pleasing to your eye.

Finally, stand back and admire your creation. Adorable, right?!

I used this arrangement not only for my dining room table but also for a baby shower for my niece. This would also be great as a little Christmas tree with small ornaments hanging from it.

Here is another view of my completed arrangement, complimented by my husband and son playing chess :)


Sunday, March 8, 2015

DIY: How to Refinish Your Dining Room Chairs

First off, you should know that this was my first attempt at refinishing wood chairs. This is basically me, telling you, that I am FAR from being an expert. With that out of the way, let's dive in!

Here are the chairs:


The one on the far right is the original chair with its original stain. When I took this picture, I had done only a light sanding with the palm sander but as you can see, there was still a ways to go.

The middle picture is after a full sanding with the palm sander. See that sander dust all over the chairs? Do this project outside - not worth the clean up inside, trust me.

After I got all of the chairs looking like this middle chair, I then applied a Miss Mustards Seed Milk Paint wash purchased at my local Annie Sloan stockist here in town called Patina Home and Garden. Patina has a wide range of Milk Paint products and the store owner talked me through what I needed to do to get these chairs looking the way I wanted.

After I applied that light wash, I let it dry completely. It didn't take long.

See the chair on the far left? This is how the finished product looks! I lightly sanded (just with sand paper) the milk paint wash and then sealed it with hemp oil. The wood absolutely glowed once I was finished. Without necessarily meaning to, this is the EXACT finish I was going for!

Finally, I sealed the wood seat with a clear poly and let it air dry for several days.

I highly recommend working with milk paint. This was my first go at it and I loved how easily it moved on the wood surface and how easily I was able to affect change with simple sand paper and hemp oil.

Give it a try!

Tuesday, December 2, 2014

DIY: Mason Jar Snowglobes

You GUYS!!!!! I am pretty excited about this DIY. Can you tell??


Trust me when I tell you that this is a super duper simple DIY.

I saw the original mason jar snow globes on the Anthropologie website and fell in love. And then I thought, "Wait! I could make those for less than the cost of buying one!". I decided to make a small stash of globes to sell at one of the local stores I work with and began planning right away. You will need a few supplies but getting most of the stuff at Michaels and using both the mailer coupon AND the coupon code on my phone saved me quite a bit of the green stuff. Shall we delve in?

Supplies Needed:

Mason jars. I prefer the smaller to medium sizes - it sets the perfect little tableau. I discovered these blue ombre jars at Michaels and decided those were my new favorites.

Pack of small to medium Christmas trees. Again, this was a Michaels purchase. I bought a multi pack of like 15 trees in the Christmas train section.

Really small Christmas elves/characters. Once again, Michaels and in the Christmas train section.

Epsom salts. I picked up a bag at the grocery store for like $2.00. Easy

Hot glue gun and hot glue gun sticks.


The key with this project is having a surface to lay things out so that you can fit each tableau onto the inside lids of the jars well BEFORE you do any gluing. You will need a bit more clearance for the lip of the mason jar fitting into the lid than you think. I laid everything out and then one by one, hot glued the tree first, then the figures to the inside of the metal disk that fits inside the ring. Just deal with the disk right now.
 
Once the figures were set, I carefully ran a thin bead of hot glue along the metal ring of the mason jar and fit the disk into that. I pressed firmly until it was flush with the inside of the metal ring. I botched the first one and used a little less glue and took a bit more time with the next ones. Success!

After the disks and rings were happily married, I turned my ombre jars right side up and poured about half a cup of epsom salts in. If you are using larger jars, use more salt. You want it to look like a little snow drift but not so much that it covers too much of the figurines.

Then I screwed the lids onto the jars nice and tight and turned them upside down.

Voila!

Easy right?!

I have seen these look great with just clear glass and groupings of several different sizes. Just use what speaks to you! Are you going to try making this?

Monday, October 6, 2014

DIY: Backyard Fabric Garland

See those big kids on bikes?  Those are my older two.  They are getting too big.  And see that garland hanging on my back fence?  I made that this weekend.  It is way longer than you can appreciate based on this photo.  I gathered up a bunch of my favorite vintage and colorful fabrics and chopped out some triangles and sewed them to burlap twine.  It was literally that simple and I love the way it looks.


Have you ever made a fabric garland? Are you looking for a use for those fabric scraps in your craft room? You should try this!


Monday, September 1, 2014

Board Books

DIY: book headboard
Check out this incredible headboard made of books.  Perfect for the book lover...or possibly for someone who suffers from insomnia?  For tips on how to make this incredible headboard please visit this website - she will show you how to do it from start to finish.


Friday, August 29, 2014

DIY: Dressing Up the Foyer...

I have been looking for a long time for a storage savvy piece for my foyer.  Now don't start thinking I have a grand foyer; the very word "foyer" sounds grand doesn't it?  Well, my foyer situation is not grand but after lots of searching and thinking and more searching I finally found the perfect piece.

I found this piece at my local favorite flea/antique haunt.  It was olive green when I found it:


I knew that it needed to be French Louis blue. I used my favorite Annie Sloan chalk paint and cleaned this old girl right up.  It took a good 2 1/2 coats; I spent the bulk of my painting time talking to Sophie so I quite enjoyed myself. I finished the whole piece off with Annie Sloan wax and allowed a few days to dry completely before I styled it.

Here is this beauty NOW:


The drawers contain ALL of our DVD binders and Wii games.  We still have a whole spare drawer for whatever crops up in the future.  I loved the colors and lines of this piece.  Also, it weighs a TON, so it isn't going anywhere anytime soon. Like, it seriously weighs a ton and I still can't believe that I hauled it out of my car and into my house. If I ever doubt my own strength I just have to look at this giant thing and pat myself on the back.


Tuesday, August 26, 2014

Pretty Twine

Want to see the prettiest twine EVER?


handmade fabric twine diy included video tutorial

This just makes my heart go pitter patter.  Like seriously.  I have millions and millions of fabric scraps. This will be the perfect way to use them all!  Got to do this right now...


Tuesday, May 20, 2014

DIY: Spring Flowers


We are channeling purples in the dining table flower box today. This simple chalk painted mason jars DIY vintage flower box is still one of my favorite things in our home.


Monday, May 5, 2014

Thumbprint of You...


Thumbprint portrait. Scraps of paper all about you.
This is genius (in my opinion). It is a thumprint using scraps of paper...all about YOU.  Find scraps in magazines, newspapers, etc.  Cut up, turn into a finger/thumbprint.  It would be a fantastic gift too!  Think of how much your mom or dad would love something like this...

Love it.

Wednesday, April 9, 2014

DIY: Spring Centerpiece with a Vintage Crate and Mason Jars!

 A few weeks ago I stumbled upon a neighbors garage sale and brought home this beauty of a box!  Vintage, perfect coloring, and wood in good condition.  Then I grabbed my chalkpaint colored mason jars (I made a dozen for a bridal shower back in February), filled them with purple wildflowers and viola!  A spring centerpiece on our dining room table!


Vintage crates like the one pictured above usually go for between $20-$60 depending on dealer, size, condition.  My neighbor gave me a generous price of $20; you can be sure I will be going back to her post haste :).

Wednesday, March 12, 2014

DIY: Vintage Bottlecap Magnets


You guys.  These are the easiest things in the world to make.  Like EVER.

Supplies Needed:

Vintage bottlecaps
Small circular magnets
Hot glue gun and glue sticks

Step 1 - Find a source for old bottle caps.  Some people collect them, some find them on ebay, some find them in thrift/antique stores.  Me?  I have a guy on ebay that I get them from. Just search on ebay under the term "vintage bottle cap lot".

Step 2 - Go to Michaels or Home Depot and get a pack of small circular magnets to match up with the number of bottle caps you will be using.

Step 3 - with a hot glue gun, attach the small magnets to the back of the bottle caps.

DONE.

I completed my sets (which are sold in stores around the Bay Area as gift items and on my etsy site) by getting metal carpet tacks (I think that's what they are called) at Home Depot and backing with my business card.

So simple.  Great gift.  The end. Now go forth and create some of your own!

Sunday, January 5, 2014

DIY: Kids Kitchen Makeover!

This post is originally from my personal blog back in 2009...
________________________________________________________________


I hit the jackpot with a wooden Pottery Barn play kitchen for my kids this past weekend. While it had good bones, it really needed some TLC.

Here was our humble beginning:


I began this process by taking the doors and hardware off and taped it up in preparation for paint. Also, the kitchen was too short for my tall four and six year old so I simply attached feet. The feet are spindles from the stair/banister section at Lowes. I predrilled some holes in the base and screwed the new legs in. BOOM! Necessary play height achieved!


Then it was off to painting. I did away with all over priming since the existing pink was a great base. I simply roughed up the surface with a light sanding with some sand paper. I gave the new spindle feet a quick light coat of white spray paint I had on hand for priming. I used glossy red spray paint and it took two full bottles.


This part took awhile because I wanted an even finish. I allowed for drying time in between coats.

I then repainted the original silver components, added a tile back splash (out of necessity - I messed up with my spray paint on that section), added a new silver piece to the door and embellished it with an antique silver star. I made a little curtain with fabric from my stash and hung it on a small tension rod from Target. Finally, I visited my local Goodwill and picked up a few random small pots and pans. You would be surprised how many small containers there are at thrift stores that are the perfect size for play kitchens. The last piece was a food play set from Melissa and Doug. And that was it! DONE!


It took a little work but was such a fun project. Luckily, Simon and Sophie love it almost as much as I do and have been enjoying it tonight. It is a solid piece of furniture and I am hopeful that it will last not only through my four kids but their kids too. Bon appetite, kiddos!

Wednesday, November 20, 2013

DIY: Kitchen Cabinet Remodel!

I have been absent because of a recent and huge DIY project.  Yes...I painted my kitchen cabinets.  All of them.  In Cece Caldwell Chalk Paint Seattle Mist.  It was an incredible experience and I am thrilled with the outcome.

(Vintage-look stools at the island from Overstock.com - purchased last year for $70.  That was for BOTH and even included shipping.  Overstock.com is the BOMB)

Last year I added bead board around three sides of my island and the ends of my upper cabinet and one lower cabinet.  Of all the things I did in this kitchen, the fitting in of the bead board was the most challenging.  Pieces had to be cut carefully, there was lots of sanding - it was a long process mainly because I had never done it before and had no idea WHAT I was doing.   I purchased the bead board at Home Depot for a total cost of $140.  It has given the island and ends a much more substantial and custom look.

Last year I also added new handles to all of my drawers - 14 handles total at $5 a piece from Lowes for a total of $70.


And see those bun feet?  I installed those too - it gives the cabinets a more custom look.  They were each $5 at Home Depot and I installed 6, for a total of $30.  I still have 3 more to set in but I'm happy with the ones that are in now.


The way the light from my kitchen window hits the cabinets make them seem like they are glowing.  That is the beauty of chalk paint.  You get the chalk paint color but also whatever was underneath - they appear very layered and aged, which is the exact look I was going for.  The bottles that you see are all vintage and from various flea markets over the years.  The grey window is OLD and from a friend.


I removed the small cabinet doors over the microwave and instead filled the space with a dozen old bottles, collected form all over the place.  We never really used this space for storage because it was in an awkward place to access so turning it into a display worked great.  I love the contrast of the clear/blue/green bottles against the aged grey chalk paint.  The Schwepps box is vintage and from my favorite Napa antique store, Antiques on Second.  The Green Valley sign was painted by a local artist on reclaimed barn wood; I purchased it 2 years ago and love how it captures the spirit of where we live.


This is the window over my sink.  I made the over sized valance from burlap and then appliqued a piece of an antique feed sack from Lancaster County, PA (which is where both of my parents grew up).


My multi layered and very ornamented chandelier in the eating area.  It's "garnishes" change with the season and is my favorite part of the whole kitchen.

One thing that was a hugely helpful purchase and is not pictured here were the chrome slider shelves by Rev-a-shelf, sold at Lowes.  We bought three units priced at $100 each and they are AWESOME.

The system we bought looks like this:
 

Totally worth every penny.  Next month I am going to add 4 more to my kitchen island.  Seriously, if you don't have these you need to get some.  Also, they are simple to install.  Read the instructions carefully; I actually watched a youtube video on how to install and it was hugely helpful.

Finally, I was sick of my two trashcans in the kitchen - one for recycling and one for regular trash.  They were constantly moving around and the latch on one of them had been broken for awhile.  So I invested in a really strong trashcan that looks like a piece of furniture in our kitchen.

 
 I purchased the Simple Human Recyclers and we love it.  If you can love a trashcan, that is.   I purchased it at Bed Bath and Beyond for $150.

So the total cost breakdown for my kitchen redo is as follows:

Bead board (added 1 year ago) - $140
Cabinet Hardware (added 1 year ago) - $70

2012 - $210

Cece Caldwell Chalk Paint in Seattle Mist (2 containers) - $78
Semi Gloss Polyurethane (2 containers) - $34
Foam Brushes - $20
Rev-a-Shelf chrome organizer units (3 units) - $300
Wood bun feet for cabinets - $30
Simple Human Trashcan - $150

2013 - $612

TOTAL KITCHEN CABINET REMODEL PROJECT - $822

For $822 I am thrilled with my kitchen.  Yes, I need to get new counters but that will come with time.  I LOVE the color of the cabinets.  I love my new shelves and trashcan and decor - I literally would not change a thing.

Next up...my kitchen table and chairs redo.  I had to - I was on a major painting binge! 


Monday, October 21, 2013

Make it Monday: Scrap Fabric Tassels

DIY: Pretty Scrap Fabric Tassels
As an avid sewer and hoarder of colorful prints, I have ALOT of fabric scraps.  I am always looking for ways to use every SINGLE piece of my scraps and this DIY project is a great way to do that.  This project was originally posted on Decor 8 so please check out the link for all of the instructions.  Trust me, it's really simple.  This is the kind of project that you can do while sitting in front of the TV watching "New Girl" :)

Make Me: Pretty Scrap Fabric Tassels by decor8, via Flickr


Friday, August 23, 2013

Gifts To Make To Give

Did that blog title make sense?  I have recently discovered a great site called The 36th Avenue - here author Vanessa Christenson has some fantastic tips on gifts to make that AREN'T corny or cheap or overdone.  I promise :). 

Check out a few of my favorites and spend a little time on this site:

 25 Handmade Gifts for 5 dollars. the36thavenue.com

 Cupcake baking set for the baking enthusiest in your life.  A great use for all of those brightly colored yet slightly mismatched liners you have collected, plus sprinkles and a few other bits and bobs packed up in a little case.  Adorable?  Check!

25 Handmade Gifts for 5 dollars. the36thavenue.com


Chunky knit bracelet out of thin strips of jersey.  She has included a very helpful tutorial on this simple project that packs a fashion punch.  Awesome?  Check!

 25 Handmade Gifts for 5 dollars. the36thavenue.com

 Simple yet colorful fabric scrap keychains.  The sky is the limit on size and embelishments for this project.  Best part - a great way to use up your awesome fabric scraps.  Tutorial here.  Awesome?  Check!

There are 25 projects listed here and the three I mentioned were just my favorites.  Check it out and design the perfect gift for someone with beautiful supplies you already have on hand.


Wednesday, August 21, 2013

Watercolor Quilt

Want to see a truly unique quilt
WATERCOLOR QUILT
I LOVE this.  It is currently sold out...but my DIY brain is already churning.  Maybe take a plain white quilted fabric and paint the circles with tie dye paint (better to get the water color effect than standard fabric paint - also, fabric paint is stiff and sometimes scratchy - this won't happen with dye), then wrap the whole piece in plastic to let the colors set for a few days.  Wash out and presto - tie dye watercolor circle quilt.  I also adore the binding; it brings the whole piece together.

I'd love to try this...