Pages

Showing posts with label Outdoor Spaces. Show all posts

Friday, May 22, 2015

DIY: Yarn Bombing

Did you know that yarn bombing is a real thing? Like, a legitimate art form?!

My good friend Kristy has been yarn bombing around her neighborhood in NYC and everywhere else that she visits (from California to Iceland) for years now. When she visited our family two years ago she yarn bombed my street sign and a rock in our front yard. BAM! I was hooked.

I am game for anything that I can make with my own two hands and is colorful. Let it be known that I do not know how to knit or crochet. However, that didn't stop me from my yarn bombing exploits! I simply went to our local Goodwill and neighborhood thrift shops and picked up various multi colored afghans and scarves. I chopped them up, attached them to a tree in my back yard (sewing them up with simple needle and thread) and voila! New life given to the faded glory of a thrift shop blanket!


Here is a tree in our backyard. There are afghans, knitted scarves and colorful skeins of wool covering this tree. I also found an adorable already yarn bombed bird feeder from Target (from their Christmas ornament collection last year). I mean...totally fun, right?!

Here is another view of this beauty...


ANYONE can do this. If you are looking to add a little color to your landscape, yarn bombing could be for you. Have at it; you can't go wrong with this art form!


Full disclosure: Over time, yarn will fade outside. The elements will do a number on your brightly colored patchworks of yarn. BUT. You should be able to get 2-3 years of life out of a yarn bomb project. If you live in an area with a lot of rain (sadly, here in the Bay Area we are in a drought so yarn bombs stay regrettably pristine) you may get your colors washed out faster.



Thursday, April 2, 2015

Beautiful Blooms


You know what I love about geraniums? You can't kill them. Like...seriously. I don't even remember planting these which means they have been in that pot for several years which ALSO means they have survived several hard freezes (believe it or not, we get those sometimes in the Bay Area). I forget to water them. Summers can get nasty hot. And yet they live. And they are so pretty and vibrant!

So thumbs up to these gorgeous blooms! They really deserve all of the credit. I just take the pictures :).

Lantern in the upper left from Ikea that I painted with a wash of water and Annie Sloan Chalk Paint.

Thursday, June 27, 2013

Backyard Movie Theater


It's FINALLY summer.  Which means late nights, BBQ's, kids racing around the court and over fences into each others backyards, trampoline jumping with sprinklers on underneath, watering flowers and of course backyard movies. 

Living in Northern California, we are blessed with really beautiful weather most of the year.  When summer hits, watching a movie outside with loads of friends seems so wholesome and fun.  I decided that this is the year to figure out how to set up a proper outdoor movie theater...without breaking the bank. 

We have a projector: check.  We have a dvd player and a few speakers: check.  We have a big yard and enough seating: check.  Now to get a screen figured out. 
I found this tutorial on all things backyard movie theater and had to share.  I hope to be back shortly with my fancy new outdoor movie theater screen...made from blackout curtains!  I can't wait!

Wednesday, April 17, 2013

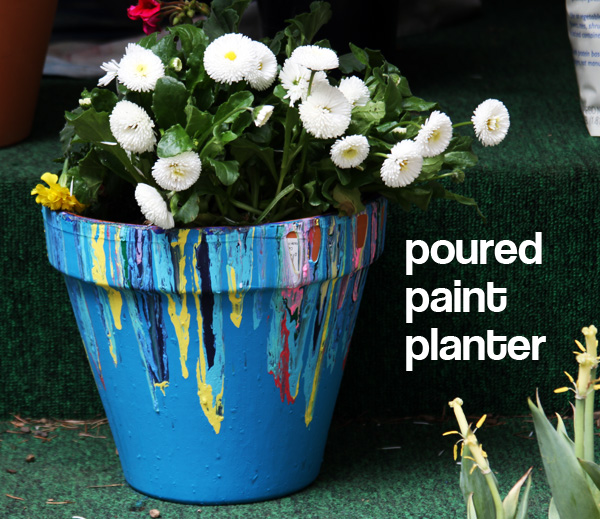
Paint Drip Flower Pot


 poured paint planter


I just discovered this tutorial.  What a great idea for summer planters.  And you could use any paint that you've got laying around - house paint would even be great.  I'm going to need to try this!

Sunday, June 10, 2012

Summer Planting...

It's practically summer already, right?  School is out, kids are back in swim team, the heat index is starting to soar.  We're all spending more time outside; shouldn't we put some of our creativity to use and beautify our outdoor spaces?

Do you have a spare car in need of a fresh coat of grass?  No?  Darn it; the picture makes a grass car look like such fun :)


I am loving this idea for colorful landscape grooming.  It doesn't look difficult to replicate either.


And finally, the flowers spilling out of the pot look painting perfect, don't they?  Planters don't always have to stand upright; its alright to tip them over when beauty is pouring out!


How are you planning to mix up your summer planting this season? Do any of these ideas inspire you?

Friday, April 6, 2012

DIY: A New Playhouse Roof


A few weeks ago I ripped off the mangled blue tarp that had been covering our play structure for the past four years and decided that enough was enough. That tarp was an eyesore. It was ripped, ugly, and well past its prime.

I went to Hacock Fabrics and purchased this red and white striped outdoor Sunbrella fabric. I purchased six yards just to be on the safe side. Once I got home I simply measured the length by holding it over the play structure supports and then staple gunned it to the structure.

I didn't hem the sides because they matched up perfectly with the width of the structure.

I know, my methods aren't perfection but the end result sure looks better. I am confident that my neighbors are thanking m.

Guys, this is REALLY easy to do. It cost me $38 (I used a 40% off coupon at the store) and borrowed a friends staple gun (thanks Sarah!). There is no need to spend over $100 on a new tarp that probably won't even LOOK the way you want it to look.

I like looking out my back window now and seeing this circus-feel play structure.

Sunday, September 25, 2011

Wreath Love


I NEED to make this...though this may be better suited for warmer weather and not the rainy season that will soon be upon my part of the Bay Area :)

Isn't it pretty?

Wednesday, July 27, 2011

DIY: My Playhouse Redo

In early May I was driving around a community yardsale in our area when I struck gold for any mother of four young children: a large Little Tikes outdoor playhouse. And in very good condition. And only $40. SOLD. My car literally did an only-in-the-movies skid into the family's driveway, I yelled out the window, "I'll take it", loaded it and peeled outta there.

The trouble was, the colors were awful. My backyard already looks like Romper Room. I did NOT want to add to it with this Smurf blue door and teal roof. Uggghhhhh. Shuddder.

So I did a little research on spray painting plastics. It turns out there is a whole line of spray paints just for painting outdoor plastic things! I went to Home Depot and gathered the necessary supplies. I took the structure apart (which was very easy considering it is just 10 screws) and began.

First I power washed the structure and let it dry completely.

Next, I roughed up the whole surface of the play structure. I used painters tape to tape off parts I didn't want certain colors on. This part was time consuming (as all taping with painting is). I spray painted over a few afternoons when I had time and when additional coats were necessary (the black roof required several coats of paint because that teal kept bleeding through).

Once everything was dry, I glued a steel number '8' to the front door, moved it into place on our patio and called it a day!

I am SO much happier with the finished result. In truth, this project took twice the amount of time I thought it would and I made a lot of mistakes that I now have to live with (but hey, its a kids plastic playhouse so I'm not going to beat myself up over it).

At least the play house and my backyard looks cohesive now and much less like Romper Room.

Except of course, for the kids :)

Wednesday, June 1, 2011

Get Away to the Great Outdoors...

This may be one of my favorite pictures ever :)

Lately we have been spending a lot of time outdoors making our backyard an extension of our indoor living space. Its easy to do that living in California (although the rains of late have dampened our plans a bit). We've created our very first garden on one of our side yards, hung lanterns and baskets of flowers around the perimeter of our yard, freshened up chair cushions and just today I laid some new flagstone to make a little path around our new said garden (thanks to my friend Sarah). We are truly rolling up our sleeves to make our piece of the great outdoors GREAT.

I find inspiration in some of these pictures:


I wish that we could have a fireplace in our outdoor space - it would be so cozy! And I wish for an overhead trellis as well...Isn't this space gorgeous?

I love this space! I want to hide out in this little "treehouse" and take a nap! Or maybe listen to my kids laughing and playing house in there. Its so beautifully nestled in the trees and shrubs; what a beautiful retreat.

We spend the bulk of our warm spring and summer months outside (and into the fall as well), so I like for the backyard to be a colorful, true extension of our home. But that takes WORK and time. I'm grateful for a little inspiration :) What have you been working on in your outdoor spaces and what inspires you?

Wednesday, March 16, 2011

Inspiring Outdoor Spaces


Via Sara's pins on Pinterest...

Leaving you with some gorgeous outdoor spaces to gaze at. Aren't they lovely? Inspiring?Makes me long for spring weather around here... Its time to sink my hands into earth and plant flowers, plump up pillows on chairs and light some lanterns.


Photos courtesy Tara Sloggett


Via Sara's pins on Pinterest (originally found on Interior Alchemy)

What kinds of accessories and furniture do you like to surround yourself with in your outdoor space? What is on your outside wishlist for spring? Do tell...