Saturday, November 30, 2013
Count your Blessings...
It was a quiet Thanksgiving. We participated in our town Turkey Trot in the morning (and turned in some nice performances I might add. My 10 year old is crazy speedy at this 5K business - he PR'd with a time of 21:54). Then we cleaned up and COOKED. It was just the 6 of us. So the house was filled with the sound of the Macy's Day Parade on TV, smells of pies and stuffing cooking, sights of our twinkling Christmas tree. Add some luxurious naps, dinner around 5 and a family viewing of my new favorite Christmas movie "Elf" and that was Thanksgiving 2013.
We don't live near family; in our nearly 16 years of marriage we never have. Most of the year I don't mind the distance but at Thanksgiving I do. I feel like Thanksgiving is the ONE holiday when most extended families come together. Although our family of 6 normally feels really boisterous and busy...on Thanksgiving it feels a little small. I found that I was feeling a bit blue most of Thursday and decided to take stock of my feelings towards the end of the day. My husbands family is mostly in Utah; mine is in Virginia. Some of my best friends still live in NYC or the East Coast. And the friends that we have here in California cling to their extended families during the holidays. So I was feeling alone.
Which was when I decided to "count your many blessings, name them one by one". I have so much to be grateful for. I decided not to let one day influence my feelings about Thanksgiving and the blessings that have been bestowed on me and my family.
When in doubt, just count your many many blessings. "And it will surprise you what the Lord has done".
Labels:
family,
Thanksgiving
Wednesday, November 20, 2013
DIY: Kitchen Cabinet Remodel!
I have been absent because of a recent and huge DIY project. Yes...I painted my kitchen cabinets. All of them. In Cece Caldwell Chalk Paint Seattle Mist. It was an incredible experience and I am thrilled with the outcome.
(Vintage-look stools at the island from Overstock.com - purchased last year for $70. That was for BOTH and even included shipping. Overstock.com is the BOMB)
Last year I added bead board around three sides of my island and the ends of my upper cabinet and one lower cabinet. Of all the things I did in this kitchen, the fitting in of the bead board was the most challenging. Pieces had to be cut carefully, there was lots of sanding - it was a long process mainly because I had never done it before and had no idea WHAT I was doing. I purchased the bead board at Home Depot for a total cost of $140. It has given the island and ends a much more substantial and custom look.
Last year I also added new handles to all of my drawers - 14 handles total at $5 a piece from Lowes for a total of $70.
And see those bun feet? I installed those too - it gives the cabinets a more custom look. They were each $5 at Home Depot and I installed 6, for a total of $30. I still have 3 more to set in but I'm happy with the ones that are in now.
The way the light from my kitchen window hits the cabinets make them seem like they are glowing. That is the beauty of chalk paint. You get the chalk paint color but also whatever was underneath - they appear very layered and aged, which is the exact look I was going for. The bottles that you see are all vintage and from various flea markets over the years. The grey window is OLD and from a friend.
I removed the small cabinet doors over the microwave and instead filled the space with a dozen old bottles, collected form all over the place. We never really used this space for storage because it was in an awkward place to access so turning it into a display worked great. I love the contrast of the clear/blue/green bottles against the aged grey chalk paint. The Schwepps box is vintage and from my favorite Napa antique store, Antiques on Second. The Green Valley sign was painted by a local artist on reclaimed barn wood; I purchased it 2 years ago and love how it captures the spirit of where we live.
This is the window over my sink. I made the over sized valance from burlap and then appliqued a piece of an antique feed sack from Lancaster County, PA (which is where both of my parents grew up).
My
multi layered and very ornamented chandelier in the eating area. It's
"garnishes" change with the season and is my favorite part of the whole
kitchen.
One thing that was a hugely helpful purchase and is not pictured here were the chrome slider shelves by Rev-a-shelf, sold at Lowes. We bought three units priced at $100 each and they are AWESOME.
The system we bought looks like this:
Totally worth every penny. Next month I am going to add 4 more to my kitchen island. Seriously, if you don't have these you need to get some. Also, they are simple to install. Read the instructions carefully; I actually watched a youtube video on how to install and it was hugely helpful.
Finally, I was sick of my two trashcans in the kitchen - one for recycling and one for regular trash. They were constantly moving around and the latch on one of them had been broken for awhile. So I invested in a really strong trashcan that looks like a piece of furniture in our kitchen.
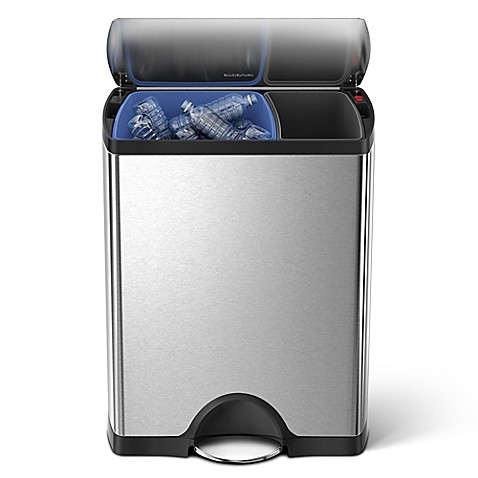
I purchased the Simple Human Recyclers and we love it. If you can love a trashcan, that is. I purchased it at Bed Bath and Beyond for $150.
So the total cost breakdown for my kitchen redo is as follows:
Bead board (added 1 year ago) - $140
Cabinet Hardware (added 1 year ago) - $70
2012 - $210
Cece Caldwell Chalk Paint in Seattle Mist (2 containers) - $78
Semi Gloss Polyurethane (2 containers) - $34
Foam Brushes - $20
Rev-a-Shelf chrome organizer units (3 units) - $300
Wood bun feet for cabinets - $30
Simple Human Trashcan - $150
2013 - $612
TOTAL KITCHEN CABINET REMODEL PROJECT - $822
For $822 I am thrilled with my kitchen. Yes, I need to get new counters but that will come with time. I LOVE the color of the cabinets. I love my new shelves and trashcan and decor - I literally would not change a thing.
Next up...my kitchen table and chairs redo. I had to - I was on a major painting binge!
(Vintage-look stools at the island from Overstock.com - purchased last year for $70. That was for BOTH and even included shipping. Overstock.com is the BOMB)
Last year I added bead board around three sides of my island and the ends of my upper cabinet and one lower cabinet. Of all the things I did in this kitchen, the fitting in of the bead board was the most challenging. Pieces had to be cut carefully, there was lots of sanding - it was a long process mainly because I had never done it before and had no idea WHAT I was doing. I purchased the bead board at Home Depot for a total cost of $140. It has given the island and ends a much more substantial and custom look.
Last year I also added new handles to all of my drawers - 14 handles total at $5 a piece from Lowes for a total of $70.
And see those bun feet? I installed those too - it gives the cabinets a more custom look. They were each $5 at Home Depot and I installed 6, for a total of $30. I still have 3 more to set in but I'm happy with the ones that are in now.
The way the light from my kitchen window hits the cabinets make them seem like they are glowing. That is the beauty of chalk paint. You get the chalk paint color but also whatever was underneath - they appear very layered and aged, which is the exact look I was going for. The bottles that you see are all vintage and from various flea markets over the years. The grey window is OLD and from a friend.
I removed the small cabinet doors over the microwave and instead filled the space with a dozen old bottles, collected form all over the place. We never really used this space for storage because it was in an awkward place to access so turning it into a display worked great. I love the contrast of the clear/blue/green bottles against the aged grey chalk paint. The Schwepps box is vintage and from my favorite Napa antique store, Antiques on Second. The Green Valley sign was painted by a local artist on reclaimed barn wood; I purchased it 2 years ago and love how it captures the spirit of where we live.
This is the window over my sink. I made the over sized valance from burlap and then appliqued a piece of an antique feed sack from Lancaster County, PA (which is where both of my parents grew up).
One thing that was a hugely helpful purchase and is not pictured here were the chrome slider shelves by Rev-a-shelf, sold at Lowes. We bought three units priced at $100 each and they are AWESOME.
The system we bought looks like this:
Totally worth every penny. Next month I am going to add 4 more to my kitchen island. Seriously, if you don't have these you need to get some. Also, they are simple to install. Read the instructions carefully; I actually watched a youtube video on how to install and it was hugely helpful.
Finally, I was sick of my two trashcans in the kitchen - one for recycling and one for regular trash. They were constantly moving around and the latch on one of them had been broken for awhile. So I invested in a really strong trashcan that looks like a piece of furniture in our kitchen.
I purchased the Simple Human Recyclers and we love it. If you can love a trashcan, that is. I purchased it at Bed Bath and Beyond for $150.
So the total cost breakdown for my kitchen redo is as follows:
Bead board (added 1 year ago) - $140
Cabinet Hardware (added 1 year ago) - $70
2012 - $210
Cece Caldwell Chalk Paint in Seattle Mist (2 containers) - $78
Semi Gloss Polyurethane (2 containers) - $34
Foam Brushes - $20
Rev-a-Shelf chrome organizer units (3 units) - $300
Wood bun feet for cabinets - $30
Simple Human Trashcan - $150
2013 - $612
TOTAL KITCHEN CABINET REMODEL PROJECT - $822
For $822 I am thrilled with my kitchen. Yes, I need to get new counters but that will come with time. I LOVE the color of the cabinets. I love my new shelves and trashcan and decor - I literally would not change a thing.
Next up...my kitchen table and chairs redo. I had to - I was on a major painting binge!
Subscribe to:
Posts (Atom)